5 tips for choosing shoes for your toddler


Choosing shoes for your toddler can be overwhelming! There are so many brands and styles to choose from. The shoes you put your toddler in can impact their foot development, arch development and overall comfort. Here are 5 important tips to consider the next time you are choosing shoes for your little one:


  1. A wide toe box. You want to ensure that the front part of the shoe (the toe box) is wide enough to fully allow your child’s foot to splay/spread out when they are walking. This is important for their balance and both the structural and muscular development of their feet.
  2. A flexible sole. You should be able to easily bend the shoe when you are pushing from the toe and the heel. This will allow their feet to move more naturally while they are walking and promote the development of their arches by allowing their intrinsic foot muscles to engage.
  3. Firm heel cup. The heel cup should be firm – if you pinch the heel of the shoe, it should maintain shape. This will provide adequate support for your child’s feet.
  4. The right size. It’s important to have shoes that fit your child properly, resist the urge to buy shoes that are too big!  The “flex point” of the shoe should line up with where their foot bends when walking. If a shoe is too big, then these two spots will not align. Their feet will be less supported in a larger shoe and can also lead to more tripping and ankle injuries.
  5. Secured. Having shoes with velcro or laces are ideal to make sure they fit snugly on your child’s feet. This will prevent “toe gripping” and decrease tripping. Toe gripping happens when shoes are too big or aren’t secured onto the foot well enough. It can lead to instability and over time lead to foot or leg pain.


Proper footwear is so important, especially in the early years! If you have any questions please reach out, we are always happy to help! 


Figure Skating and Common Injuries

Figure skating is a demanding sport that requires flexibility, balance, strength, and artistry. It is a skill-based sport that requires many repetitions of complex movement patterns across all disciplines. With the demands of on-ice, off-ice, flexibility, and dance training, overlooked injuries can grow to more complex injuries.

The Top 4 Figure Skating Injuries:

  1. Ankle Sprains
  2. Knee Pain
  3. Back Injuries, from extreme positions or the impact on landings with a rigid boot
  4. Concussions, can be from falls with or without a direct hit to the head

How physiotherapy can help:

  1. Addressing an injury early can prevent the progression from an acute to a chronic injury. By identifying injuries early on, skaters are able to return to their regular training earlier without pain, allowing the skater to focus on their coach’s feedback.
  2. Pre-habilitation and injury prevention can decrease a skater’s risk of an injury during the season.
  3. Concussions happen in the sport. Recovering from a concussion can be tricky and your physiotherapist can guide your return to sport in a safe manner.

To book an assessment with National Figure Skater and Physiotherapist, Kai-Jing Leong, click here.

Written by: Kai-Jing Leong

Severs- what it is, what is happening, how physio can help

What is Sever’s Disease? 

Sever’s Disease occurs when the C shaped growth plate at the back of your heel gets inflamed from stress from the achilles tendon. Growth plates are areas of cartilage located near the ends of the bones, and this is where bone growth occurs. Since it is the last part of a child’s bone to harden, growth plates are particularly vulnerable to injury. Adults don’t have open growth plates anymore, so this condition is found only in kids. Sever’s Disease is also 2-3 times more likely to occur in boys than girls, and it is associated with big growth spurts!

What my child may complain of?

  • No pain in the morning, but usually is worse with increased load during the day
  • Pain worsens with repetitive activities (example: running or jumping)
  • Tenderness on both the inside and outside of the heel
  • No swelling, redness or skin changes noted with this condition
  • Calf tightness

Things that may make Sever’s worse:

  • Worn out shoes
  • Hard surfaces
  • High amounts of physical activity
  • Big growth spurts
  • Back to activity after a long break

How can physio help?!

At Playworks Physio we specialize only in kiddos! We see kids with this type of heel pain VERY often, especially with the start of sports seasons. Your Physio will take a good look at what is happening and what might be causing it, and give lots of tools to help. Some things include stretching and strengthening activities, suggestions for activity modifications, shoe recommendations, and of course, this will all be FUN for your kiddo.

Our main goal is to help reduce your kiddos pain, solve the source of the issue to prevent it from returning, and improve their ability to participate in their activities again, pain free!

– Darrien Cantelo, Physiotherapist


Did you know that toe walking is something that can be treated at a paediatric physio clinic? 

When you bring your child in for an initial assessment at PlayWorks Physio, this is typically what you can expect:

  • Your physiotherapist will go over a detailed history of your child’s development (including pregnancy history, early development, toe walking habits as well as other medical history)
    • Why is a history important ?
      • If you know the root cause of the issue, then you’ll have more success in the treatment outcome. There are a few different reasons kids walk on their tip-toes:
      • 1) Neurological cause 
      • 2) Genetic cause 
      • 3) Sensory cause 
      • 4) Muscular cause  
      • Knowing the cause of the toe walking will help the physiotherapist create the most specific, and successful treatment approach for your child.
  • Watching your child move (and play)! It’s one of our best-kept, “not-so-secret” secrets. Kids are smart, when they hear “the physio is going to watch you walk,” they’ll change their pattern to walk to what they think is better. Your physio will encourage them to play around the treatment room, getting them to walk, run, skip, jump, squat, crawl, spin and bend. This will allow your physio to watch and analyze your child’s usual movement patterns.
  • Next, your physiotherapist will discuss the recommendations to fit your child’s (and family’s) individualized needs. This may include:
    • a plan for future physio sessions (if needed) 
    • exercises to work on at home 
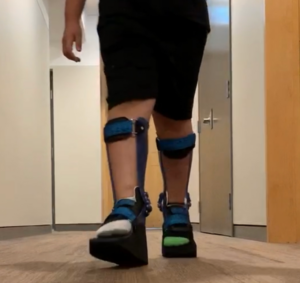
    • orthotics (some kids need extra support to help your child achieve an appropriate walking pattern. Not all kids need this support, and the goal of these is typically a short-term solution to help achieve a normal walking pattern).
    • referral to any specialists if needed

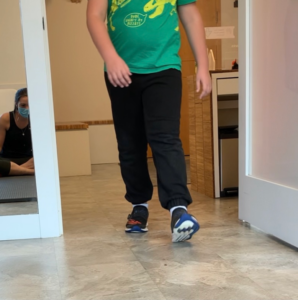
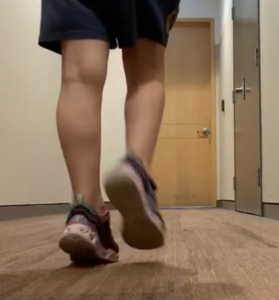
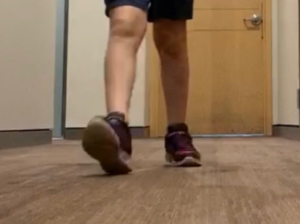
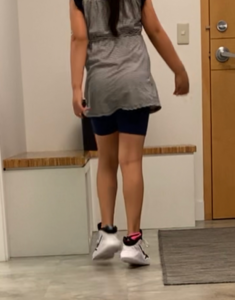
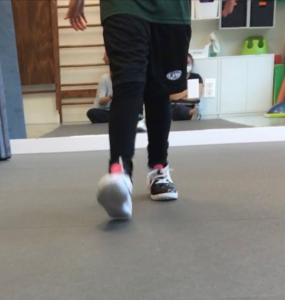
Scroll down to see some examples of kids who are working on toe walking and some before/after pictures. Our goal is to get their heels to “strike” the floor when they take a step. In the examples below, you can see the progress made with coming to physio and following a home program!

Example A:

  • This kiddo has been coming to physio since January 2020 (even virtually through the pandemic!) and his treatment plan includes weekly physio, custom orthotics, and a gait-retraining program. He’s very close to being completely discharged from physio. This family was extremely dedicated and were gold star patients in following the plan. As a result he’s had a change of 16 degrees of ankle range, and we’re not stopping yet!

Before

After

Example B:

  • Kiddo B has been intermittently coming to physio, and her physio plan includes exercises to do at home, and shoe recommendations. The before/after picture was taken in the same session! 

Before

After

Example C:

  • Kiddo C has been coming to physio once a month to work on her goals. Her plan also includes home exercises and custom orthotics. 

Before

After

If you’re interested in what we can do for your kiddo’s toe-walking habits, email us at: [email protected] or book your assessment here.

Did you know that almost everyone is born with flat and flexible feet? In their first year, babies’ feet grow extremely fast – about 2.5cm! As children get older and start walking, their feet are still flat because the bones, muscles and ligaments are not yet fully developed.


Foot development

The main arch of the foot, the medial longitudinal arch, begins to form at 3-4 years of age. This arch continues to develop throughout the first 10 years of life and many studies state that the mature foot posture is not obtained until 7-10 years of age (Uden et al., 2017). This means that we should expect our children’s feet to be flat during their first 3-4 years and to then start developing an arch over the next 7 or so years.


Factors that can affect foot development

  • Poor fitting shoes: too small, too big, too rigid
  • Not enough barefoot time at home


What about those Flat Feet?

Flat feet aren’t always problematic. As you can see from above, younger kids tend to have naturally flatter feet and therefore treatment is not always necessary. If your child goes up on their tiptoes you should be able to see their arch form. This is considered “flexible flat feet”. These should not be painful. Ultimately painful flat feet in kids are a problem and non-painful, flat feet in children (or adults!) are not a problem and do not need to be treated unless they are accompanied by any of the points listed below.


Here are some reasons why we see kids at PlayWorks Physio for flat feet:

  • Their walking pattern is different. For example, if they do not push off from their big toe, instead they use the inside of the foot
  • Complaints of foot, ankle or knee pain
  • Bunion development on the inside of the foot
  • Frequent rolling of their ankles
  • Complaints of their feet getting tired or sore after activity
  • Excessive pronation (collapsing inwards) of feet


Things you can do to encourage proper foot development in your kids

  • Find properly fitting shoes. Look for shoes with a supportive heel cup and flexible sole. CLICK HERE  to learn how to pick the best shoes for your child.
  • Have your child barefoot when safe/appropriate. This helps develop the muscles, ligaments and tendons of their feet and will contribute to arch development.
  • Play around with walking on different types of surfaces. For example: grass, hills, trails, gravel, sand etc.


If you have any questions about your child’s foot development, email us at [email protected]


Written by: The PlayWorks Team


References: Uden et al. Journal of Foot and Ankle Research (2017) 10:37

Do you want your kids to learn to skate, but are too afraid of the ice yourself to teach them? Here are 6 key steps for you and your kids to conquer skating.

  1. Figure Skate Vs. Hockey Skate

There are two main types of skates: figure skates and hockey skates. Knowing which to choose can be difficult so here are the main differences: A figure skate has a flat blade and usually a pick at the front of the blade. This means you won’t rock like you do in hockey skates, but watch out for the toe pick! It may cause you to trip if you forget about it. A hockey skate is generally black or grey and has a curved blade. If you don’t plan on becoming a figure skater or hockey player, it doesn’t matter which skate you choose. It comes down to which one you are most comfortable in.

  1. The Right Size Skate

The wrong size runner can cause you to trip over your own feet. The same rule applies to skates. If the skate is too big, your weight will primarily be on the back of the blade, making it easier to fall backwards. Skates are sized differently so when you try on a pair, line up your foot next to the skate. If there is more than an inch of extra room, it is too big. Your toes should be snug, but not squished.

  1. Protect Your Head and Knees

Helmets are a must! Whether you’re someone who has skated their entire life or just starting out, helmets are your best friend. Everyone can and will fall and it is super important to protect yourself. I suggest beginners should wear knee pads and gloves as well. The ice is cold and hard, but when you have the right gear, it is much less likely you will get hurt when you fall.

  1. Get to Know the Ice – Stand, Fall, Walk

Everyone’s first instinct when they get on the ice is to go fast. The first step to skating is simple – Walk. Skates can wobble, so you have to take it slow at first. Arms out for balance, bend your knees and keep your head up. If you can remember these 3 rules, you are well on your way. Practice falling down with hands out in front (to prevent going backwards) and stand up using your knee to push yourself up.

  1. Penguin Pushes

Once walking has become a piece of cake, the next step is to turn your toes out and try to push back. This is called a push-glide, or otherwise known as the penguins pushes. You can make your push-glide stronger by pushing someone or something on the ice.

  1. Learn to Stop

Snow plows are the first step to learning to stop without using the boards or another person. Put your feet together and glide first, then push both your feet out at the same time. Keep your arms up for balance at all times. Progress to one foot stops when this gets easier.

Once these essential skills are mastered, everything else will come easily. Next steps include backwards skating, one foot glides, crossovers, turns and many more fun skills!

Written by: Kylie Shorter, BKin


Your home is your baby’s safe zone, where they are comfortable exploring, (throwing tantrums?), and learning new skills. Creating a space with a few key elements can foster and facilitate not only their gross motor development but their sensory, vestibular and fine motor skills as well.

An ideal zone will let you place your baby down knowing that they can move around freely and touch everything in it safely. The more motivated they are to explore their environment, the more they will experiment with their movement to get them around. This play zone encourages their independence, interaction with the environment and makes learning new motor skills fun. The best part is that you do not have to go out and buy anything, just get creative with what you already have! Read on to learn about some of the best tips for making this space for your kids.

Creating A  Play Zone

Vary the Heights

One of the best things you can do is provide lots of different surfaces for crawling over, climbing up, pulling up and standing. Couch cushions, coffee tables, seats and sturdy chairs are all great options!

Baby Proof a Little

Make sure you cover the outlets and pad sharp corners, but don’t take out every possible risk. It’s important for kids to land on their bums, slip on the floor and experience small missteps. They don’t need 5 inch padding everywhere! Give them some carpeted or a matted area for being comfortable on the floor but provide some hard surfaces for better stability too

Building Blocks

Give them lots of things they can move and stack, both big and small. This will help them work their engineering minds and be creative. Use toy stackers, cups, cardboard boxes, recycled containers or anything you can think of that is safe for children.

Get Wild!

Include lots of bright colours and as many different textures as you can. Especially for young kids we want them to explore new things and be stimulated. Encourage bare feet to optimize sensory exploration and muscle building.

No Screens!

These do not promote development, are over-stimulating and take away imagination. Opt for non-electronic toys that have moving parts and encourage interaction with them. Some noise-makers are still great, but if you can, choose ones that are more simple and promote some experimenting and exploration (buttons, switches, knobs and more).

Get in the Zone

The purpose is not to leave your child alone, but to have a space where they are allowed to touch/lick/drool on everything. Teach them to use the space by getting in and playing both with them and side-by-side independently so they can model your play.

By Laura Kennedy from Move Paediatric Therapy

Playgrounds are a great place for kids to improve gross motor skills, strength and confidence.There are lots of things you can have your child try when they are on the playground to provide different challenges. Often times, kids will gravitate to the areas of the playground that are easiest for them. Incorporating other playground equipment or ideas into their play is a great way to physically challenge them, bring awareness to other ways to use play structures and be a fun task for both of you!

5 Things to Try

  1. Balancing along the edge of the playground, often times there is a border to the play area you can walk along.
    Walk forwards/backwards/sideways
  1. Climbing down a ladder rather than going down a slide or fireman’s pole. Kids typically master climbing up, however have difficulty climbing down.
  2. Hanging from monkey bars if fully completing them is too challenging. Monkey bars are difficult! As a stepping stone to learning how to achieve the monkey bar goal you can assist your child in hanging from one of the bars and set a time goal, such as 5 seconds.
  3. Sideways up the stairs to challenge different muscles. Going up the stairs sideways is another way to get to where they want to go, AND you are strengthening different leg muscles! Make sure to try both directions.
  4.    Climbing up slides is a great way to target back, leg muscles and core! Make sure you get to the park early to try this one out, so you have the slide to yourself.

You can also try a more hands-off approach at the playground to allow your child to explore on their own limits. This can be a fun way for them to challenge themselves and experiment with different ways of play. We hope you have fun trying these out during your next park adventure!

Happy Playing!

Maegan Mak & Kate Heays