Posts

Learning how to ride a bike is an exciting milestone to reach but getting started can be scary. Here is how to get your child to become a confident and safe bike rider.


Balance Bike 

A balance bike is a perfect place to start for your young one if they are not ready for the pedals. If you already have a pedal bike, remove the pedals from the crank arms of the bike to use it as a balance bike! This is a great option if your child needs to get comfortable being independent on a two-wheeler. Your child will learn how to balance on a two-wheel bike, which is a prerequisite to a pedal bike.


Getting started: 

  1. Your child’s feet should be flat on the ground when they sit on the bike saddle. Ensure that the seat height is low enough for them to ride safely and independently.
  2. Pick a lighter weight bike. Heavier bikes will be more challenging to maintain balance.
  3. Start your child sitting on the bike, helmet on, hands on handlebars, and feet flat on the ground.
  4. Start walking to roll the bike! Motivate them to do this as independentely as possible. Comfort levels around the bike will vary, so patience and positive affirmations are key!
  5. As they build confidence, motivate them to pick up the pace, and try to lift their feet off the ground for a moment to let the bike roll! This is where the balance practice comes in. Rolling down driveways or grassy hills is a great way for them to easily pick up speed and learn the feel of gliding and balancing.
  6. If they don’t have handle-bar breaks, they will have to use their feet to stop. A game of red-light/green light is perfect for practicing stopping control.
  7. Master the balance bike with turning. Start with small S turns while walking, and then try it with some speed. Build momentum, lift the feet, and attempt small, controlled turns.
  8. Be patient – every kiddo learns at their own pace. With a little, or a lot of practice, your child will be pedal-ready. Your child can upgrade to pedals when they can confidently balance while rolling long distances on the bike.


Pedal Bike 

If your child feels confident balancing while rolling and can control the balance bike while turning and stopping, it is time to graduate to try a pedal bike! If you decide to skip the balance bike and hop right onto a pedal bike, it is still beneficial to build balance skills on the bike by lowering the seat so they can practice balancing while the bike is rolling.


10 Steps for Success:

  1. Safety first! Be sure to strap on a helmet. The helmet should fit snug and not wobble when your child shakes their head. Wear closed-toe shoes. Flip flops are not a safe biking option, even in the summer.
  2. For set up, the seat height should be low enough that your child can have their feet flat on the ground, but their knees should be straight. As your child progresses, you can raise the seat height, so they have a slight knee bend when their foot is placed on the pedal when the pedal is at its lowest position.
  3. Practice getting on and off the bike. Tip: Use the hand break to prevent the bike from rolling while mounting or dismounting.
  4. Practice breaking. If your child prefers the pedal break, get them to practice the back pedal motion while stationary. You can progress this by supporting the bike and slowly rolling while they practice breaking. Red-light/Green-light game is a fun activity for this.
  5. Try turning while stationary. Make sure your child is comfortable with keeping the handlebars straight and controlled turning before doing it on a moving bike.
  6. It is time to start pedalling. One foot should be on the ground and the other should be placed on a pedal. This pedal should be positioned at about 10 o’clock. The child will push off with their foot from the ground and press down on the pedal to start rolling the bike. Give support by holding at their shoulders or on the bike seat and help push them forward to get some momentum.
  7. Bikes balance with momentum, so motivate them to get a little speed or ride down a slope. The faster they pedal, the easier it is to maintain their balance.
  8. “Look where you are going” is a great cue to remind your kid to keep their head up to prevent crashes and looking down at their pedals makes balancing very difficult.
  9. If your kiddo is swerving around, a good reminder is to “keep your elbows straight!” This will prevent turning. Reminding them to look where they are going is also helpful.
  10. Add in controlled turning by going through a line of cones. Start by giving lots of space between each cone and get your child to master the skill by moving the cones closer together.


Learning to ride is a huge accomplishment, but it can be frustrating, so celebrate all the wins along the way. Everybody learns new skills at their own pace, so be patient and have fun. Our clinic is excited to be introducing a learn to bike program in the spring to help kids at various skill levels become safe and confident riders!

If you would like to book an assessment with a physiotherapist to work on balance, strength and coordination to help with biking, click here!


Written by: Kristin McElroy, BSc. Kin


Pool Therapy

Pool Therapy (also known as hydrotherapy or aquatic therapy) is physical rehabilitation that is performed in the water. It utilizes the concepts of buoyancy, turbulence, and increased resistance to movement that cannot be re-created on land. It is a popular treatment for a variety of neurological and musculoskeletal conditions. 

What are the benefits?

  • Facilitates muscle relaxation
  • Reduces joint stiffness and improves joint range of motion
  • Reduces swelling
  • Allows for progressive weight bearing on painful joints
  • Improves muscle strength and stability
  • Improves balance, motor planning, and coordination
  • Improves cardiovascular endurance
  • Facilitates recovery after injury or surgery
  • Promotes community participation, independence & social development

Why do kids come for pool therapy?

  • To improve their confidence in the water
  • As an alternative way to strengthen muscles
  • To practice weight bearing positions in the water (the lack of gravity reduces pressure on the joints)
  • Achieving a variety of physical goals while engaging in FUN games and activities!

What does a pool session look like?

Treatment takes place at a community pool with a physiotherapist. Sessions are packed with fun games and activities that are designed to improve muscle strength, balance, coordination, cardiovascular endurance, and more!

Are you interested in pool therapy? At PlayWorks Physio, we provide individualized, 1-on-1 pool therapy with a physiotherapist to meet your child’s needs and help them work towards their goals. 

For more information or if you would like to book an initial assessment, click here or send us an email at hello@playworksphysio.com. An initial assessment in-clinic is required prior to sessions in the pool.


Written by: Melanie Touhey, Interim Physiotherapist


5 tips for choosing shoes for your toddler


Choosing shoes for your toddler can be overwhelming! There are so many brands and styles to choose from. The shoes you put your toddler in can impact their foot development, arch development and overall comfort. Here are 5 important tips to consider the next time you are choosing shoes for your little one:


  1. A wide toe box. You want to ensure that the front part of the shoe (the toe box) is wide enough to fully allow your child’s foot to splay/spread out when they are walking. This is important for their balance and both the structural and muscular development of their feet.
  2. A flexible sole. You should be able to easily bend the shoe when you are pushing from the toe and the heel. This will allow their feet to move more naturally while they are walking and promote the development of their arches by allowing their intrinsic foot muscles to engage.
  3. Firm heel cup. The heel cup should be firm – if you pinch the heel of the shoe, it should maintain shape. This will provide adequate support for your child’s feet.
  4. The right size. It’s important to have shoes that fit your child properly, resist the urge to buy shoes that are too big!  The “flex point” of the shoe should line up with where their foot bends when walking. If a shoe is too big, then these two spots will not align. Their feet will be less supported in a larger shoe and can also lead to more tripping and ankle injuries.
  5. Secured. Having shoes with velcro or laces are ideal to make sure they fit snugly on your child’s feet. This will prevent “toe gripping” and decrease tripping. Toe gripping happens when shoes are too big or aren’t secured onto the foot well enough. It can lead to instability and over time lead to foot or leg pain.


Proper footwear is so important, especially in the early years! If you have any questions please reach out, we are always happy to help! 


Figure Skating and Common Injuries

Figure skating is a demanding sport that requires flexibility, balance, strength, and artistry. It is a skill-based sport that requires many repetitions of complex movement patterns across all disciplines. With the demands of on-ice, off-ice, flexibility, and dance training, overlooked injuries can grow to more complex injuries.

The Top 4 Figure Skating Injuries:

  1. Ankle Sprains
  2. Knee Pain
  3. Back Injuries, from extreme positions or the impact on landings with a rigid boot
  4. Concussions, can be from falls with or without a direct hit to the head

How physiotherapy can help:

  1. Addressing an injury early can prevent the progression from an acute to a chronic injury. By identifying injuries early on, skaters are able to return to their regular training earlier without pain, allowing the skater to focus on their coach’s feedback.
  2. Pre-habilitation and injury prevention can decrease a skater’s risk of an injury during the season.
  3. Concussions happen in the sport. Recovering from a concussion can be tricky and your physiotherapist can guide your return to sport in a safe manner.

To book an assessment with National Figure Skater and Physiotherapist, Kai-Jing Leong, click here.

Written by: Kai-Jing Leong

Severs- what it is, what is happening, how physio can help

What is Sever’s Disease? 

Sever’s Disease occurs when the C shaped growth plate at the back of your heel gets inflamed from stress from the achilles tendon. Growth plates are areas of cartilage located near the ends of the bones, and this is where bone growth occurs. Since it is the last part of a child’s bone to harden, growth plates are particularly vulnerable to injury. Adults don’t have open growth plates anymore, so this condition is found only in kids. Sever’s Disease is also 2-3 times more likely to occur in boys than girls, and it is associated with big growth spurts!

What my child may complain of?

  • No pain in the morning, but usually is worse with increased load during the day
  • Pain worsens with repetitive activities (example: running or jumping)
  • Tenderness on both the inside and outside of the heel
  • No swelling, redness or skin changes noted with this condition
  • Calf tightness

Things that may make Sever’s worse:

  • Worn out shoes
  • Hard surfaces
  • High amounts of physical activity
  • Big growth spurts
  • Back to activity after a long break

How can physio help?!

At Playworks Physio we specialize only in kiddos! We see kids with this type of heel pain VERY often, especially with the start of sports seasons. Your Physio will take a good look at what is happening and what might be causing it, and give lots of tools to help. Some things include stretching and strengthening activities, suggestions for activity modifications, shoe recommendations, and of course, this will all be FUN for your kiddo.

Our main goal is to help reduce your kiddos pain, solve the source of the issue to prevent it from returning, and improve their ability to participate in their activities again, pain free!

– Darrien Cantelo, Physiotherapist


Did you know that toe walking is something that can be treated at a paediatric physio clinic? 

When you bring your child in for an initial assessment at PlayWorks Physio, this is typically what you can expect:

  • Your physiotherapist will go over a detailed history of your child’s development (including pregnancy history, early development, toe walking habits as well as other medical history)
    • Why is a history important ?
      • If you know the root cause of the issue, then you’ll have more success in the treatment outcome. There are a few different reasons kids walk on their tip-toes:
      • 1) Neurological cause 
      • 2) Genetic cause 
      • 3) Sensory cause 
      • 4) Muscular cause  
      • Knowing the cause of the toe walking will help the physiotherapist create the most specific, and successful treatment approach for your child.
  • Watching your child move (and play)! It’s one of our best-kept, “not-so-secret” secrets. Kids are smart, when they hear “the physio is going to watch you walk,” they’ll change their pattern to walk to what they think is better. Your physio will encourage them to play around the treatment room, getting them to walk, run, skip, jump, squat, crawl, spin and bend. This will allow your physio to watch and analyze your child’s usual movement patterns.
  • Next, your physiotherapist will discuss the recommendations to fit your child’s (and family’s) individualized needs. This may include:
    • a plan for future physio sessions (if needed) 
    • exercises to work on at home 
    • orthotics (some kids need extra support to help your child achieve an appropriate walking pattern. Not all kids need this support, and the goal of these is typically a short-term solution to help achieve a normal walking pattern).
    • referral to any specialists if needed

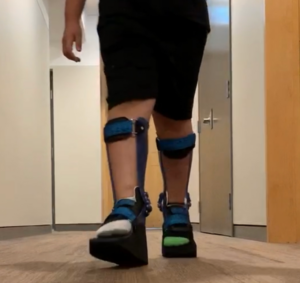
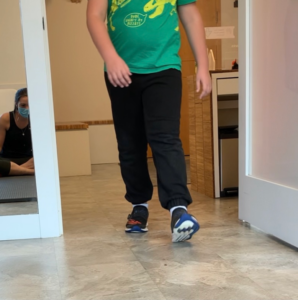
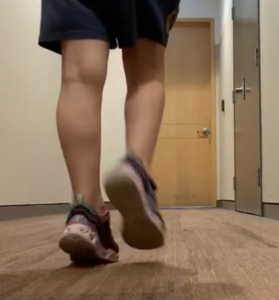
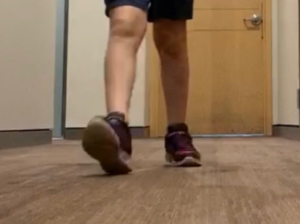
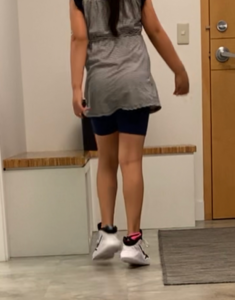
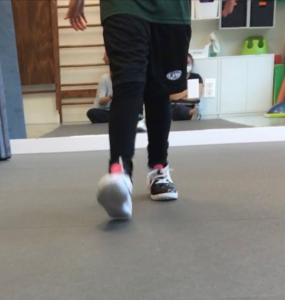
Scroll down to see some examples of kids who are working on toe walking and some before/after pictures. Our goal is to get their heels to “strike” the floor when they take a step. In the examples below, you can see the progress made with coming to physio and following a home program!

Example A:

  • This kiddo has been coming to physio since January 2020 (even virtually through the pandemic!) and his treatment plan includes weekly physio, custom orthotics, and a gait-retraining program. He’s very close to being completely discharged from physio. This family was extremely dedicated and were gold star patients in following the plan. As a result he’s had a change of 16 degrees of ankle range, and we’re not stopping yet!

Before

After

Example B:

  • Kiddo B has been intermittently coming to physio, and her physio plan includes exercises to do at home, and shoe recommendations. The before/after picture was taken in the same session! 

Before

After

Example C:

  • Kiddo C has been coming to physio once a month to work on her goals. Her plan also includes home exercises and custom orthotics. 

Before

After

If you’re interested in what we can do for your kiddo’s toe-walking habits, email us at: hello@playworksphysio.com or book your assessment here.